
Thay vì dùng yocto mình nghĩ chính ra cũng khá phức tạp với người mới, mình sẽ đơn giản hóa bằng build đơn lẻ uboot, kernel, lấy root file system có sẵn để flash tới board. Rồi ta sẽ bắt đầu series Device Driver mà chưa cần quan tâm yocto là gì :vv
1. Clone repo và chuẩn bị máy host
git clone --recurse-submodules https://github.com/Zk47T/Lichee-Nano-Device-Driver.git
cd Lichee-Nano-Device-Driver
Tải các package cần thiết cho việc build
sudo apt update
sudo apt install -y \
    build-essential git bc flex bison \
    libssl-dev libgnutls28-dev \
    gcc-arm-linux-gnueabi \
    dosfstools u-boot-tools \
    python3
Ở đây mình dùng toolchain arm-linux-gnueabi (GCC 11) luôn, do đó ta cần set biến môi trường
export ARCH=arm
export CROSS_COMPILE=arm-linux-gnueabi-
2. Build u-boot
mkdir -p output
make -C u-boot-f1c100s f1c100s_defconfig
make -C u-boot-f1c100s -j$(nproc) PYTHON=python3
cp u-boot-f1c100s/u-boot-sunxi-with-spl.bin output/
Mình đã tạo sẵn f1c100s_defconfig rồi do đó các bạn cứ việc build thôi :vv
Output sẽ tại output/u-boot-sunxi-with-spl.bin
3. Build kernel
make -C linux f1c100s_defconfig
make -C linux -j$(nproc) zImage suniv-f1c100s-licheepi-nano.dtb
cp linux/arch/arm/boot/zImage output/
cp linux/arch/arm/boot/dts/suniv-f1c100s-licheepi-nano.dtb output/
Output sẽ tại output/zImage, output/suniv-f1c100s-licheepi-nano.dtb
Ta sẽ build cả files/boot.cmd là kernel command line, copy tới output luôn
mkimage -C none -A arm -T script -d files/boot.cmd output/boot.scr
Thông thường các bạn build root file system thì sẽ là tạo cấu trúc folder rồi có thể dùng busybox để tiện cho lấy command, nhưng ở đây mình cũng đã tạo sẵn core-image-minimal-rootfs cho các bạn tại
files/core-image-minimal-f1c100s.rootfs.tar.xz
Rootfs này mình đã thêm 1 số package tiện lợi, các bạn có thể check file manifest để biết có những gì
4. Flash tới thẻ SD
lsblk -o NAME,SIZE,TYPE,LABEL          # confirm device name

export DEV=/dev/sda                    # change to your device
[[ "$DEV" =~ [0-9]$ ]] && PART="${DEV}p" || PART="${DEV}"
# sdX  → ${PART}1 = /dev/sda1
# mmcblkX → ${PART}1 = /dev/mmcblk0p1

sudo umount ${PART}1 2>/dev/null
sudo umount ${PART}2 2>/dev/null
Ta cắm thẻ sd card vào, lưu ý ở đây bạn chọn để set biến DEV đúng cho thẻ của bạn.
Thẻ mình đang nhận tại /dev/sda có thể thẻ bạn sẽ nhận tại sdb .
Ta dùng câu lệnh lsblk để kiểm tra
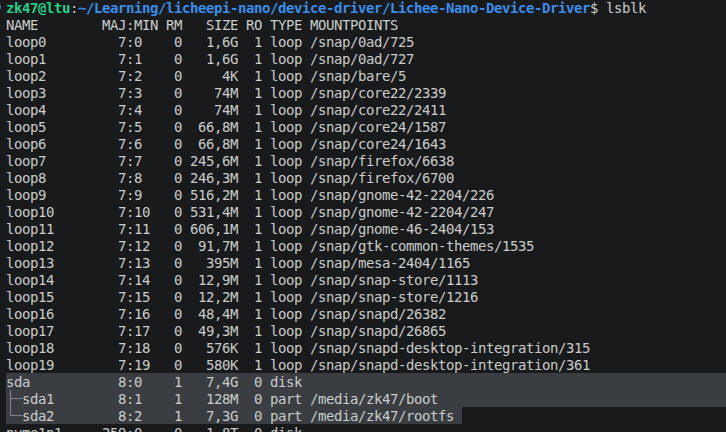
Thẻ nhớ ta cần layout như sau
| Region | Content |
|---|---|
| 0 – 8 KB | reserved |
| 8 KB | U-Boot SPL + U-Boot (raw, written directly with dd seek=8) |
| 1 MB | FAT32 boot partition — zImage, suniv-f1c100s-licheepi-nano.dtb, boot.scr |
| after boot | ext4 rootfs partition |
Ta tạo layout
echo 'label: dos
start=2048, size=128MiB, type=b
start=264192, type=83' | sudo sfdisk $DEV
Viết uboot vào vùng nhớ đầu
sudo dd if=output/u-boot-sunxi-with-spl.bin of=$DEV bs=1k seek=8 conv=notrunc
Format 2 phân vùng tiếp theo cho boot và rootfs lần lượt là vfat và ext4
sudo mkfs.vfat -n boot   ${PART}1
sudo mkfs.ext4 -L rootfs ${PART}2
Copy các boot file tới đây
sudo mount ${PART}1 /mnt
sudo cp output/zImage                                /mnt/
sudo cp output/suniv-f1c100s-licheepi-nano.dtb       /mnt/
sudo cp output/boot.scr                              /mnt/
sudo umount /mnt
Giải nén root file system tới đây
sudo mount ${PART}2 /mnt
sudo tar xfp files/core-image-minimal-f1c100s.rootfs.tar.xz -C /mnt/
sudo umount /mnt && sync
Thế là xong, giờ bạn hãy tháo thẻ nhớ ra kết nối UART tới board rồi boot lên ta sẽ có :vv
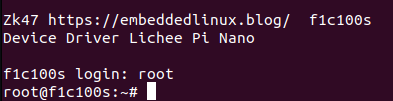
Mình để user mặc định là root luôn nhé !!
Chúc các bạn thực hành thành công
 Embedded Linux A-Z
Bình luận về bài viết này