[Android] 4. How to change the boot animation on Android 15 / Raspberry Pi 4
Translated from the Vietnamese original; wording may still be rough. Read the original →
For building Android 15 I followed the Devlinux.vn post Building Android Automotive 15 for the Raspberry Pi 4 . The only thing to watch out for in that guide is step 3.1, repo init: use this command instead (change the revision):
repo init -u https://android.googlesource.com/platform/manifest -b android-15.0.0_r26A. Overview

If you use Android you are surely familiar with the "Powered by Android" screen at boot, but this boot animation can be completely replaced with another video or picture.
That's the nice thing about Android, just like Linux: it can be customised :v I replaced the Android loading screen with this "Cat saying Huh!" meme.
B. Analysis
Android takes the boot animation from bootanimation.zip in /system/media. There are two ways to get your own boot animation onto the board:
- Change the build configuration so the built image already contains the boot animation
- Replace it directly in
/system/mediaon the board after flashing
Structure of a bootanimation.zip:
bootanimation.zip
│
└───part0 [folder name]
│   │   000.png [or .jpg]
│   │   001.png
│   │   002.png
│   │   ...
│
└───part1
│   │   000.png
│   │   001.png
│   │   002.png
│   │   ...
└───desc.txt [animation specification]
Inside, desc.txt looks like this:
[width] [height] [frames per second]
[type ("p" or "c"] [loop count] [pause] [folder] [bg color (optional)]
[type ("p" or "c"] [loop count] [pause] [folder] [bg color (optional)]

Etc. End off with an empty line.- [
width]- Image width
- [
height]- Image height
- [frames per second]
- Number of frames per second
- [type]
- Type p: the boot animation is cut off as soon as the OS finishes loading --> looks faster
- Type
c: the boot animation plays to the end before switching to the OS --> users may easily think the boot is slow
- [loop count]
- How many times this part repeats
- Note: 0 means it repeats forever
- [
pause]- How many frames to pause between parts
- [
folder]- The folder that holds the part
- [bg color]
- Background colour
For example:
800 480 30
**p** 1 15 part0 FFFFFF
**p** 0 0 part1 FFFFFF
C. Let's do it
1. Download the video you want
2. Once you have the video, use ffmpeg to cut it into frames
- If you don't have it yet, install it with:
sudo apt update
sudo apt install ffmpeg- To keep it simple I create only one part here:
ffmpeg -i input.mp4 -vf "fps=8,scale=1280:720" -qscale:v 6 -vframes 120 part0/%03d.jpg- How to work out the numbers:
total_frames = fps × duration_in_secondsIf you want a 15-second boot animation and pick fps = 8, you need 8*15 = 120 frames. Note: higher fps --> more frames --> bigger bootanimation.zip. Android only accepts a bootanimation.zip of 2-5 MB; anything bigger will not be displayed.
3. Set the desc.txt config file
As described above, I chose these values:
1280 720 8
p 1 0 part0 000000
4. Zip the part0 folder and desc.txt into bootanimation.zip
zip -r -0 bootanimation.zip desc.txt part05. Copy bootanimation.zip to the board
- Connect to the board with adb, see [Android] 2. How to connect to the Raspberry Pi 4 with ADB (Android Debug Bridge)
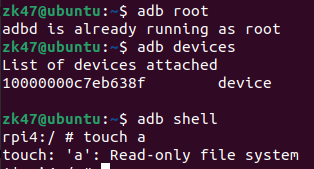
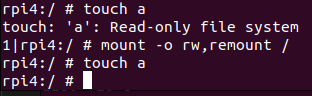
- Before copying to the board, remount the system to enable read/write; by default the system is read-only and no new file can be created.
mount -o rw,remount /- After remounting, files can be created freely.
- Ctrl + D to get back out, then go to the folder where the boot animation is stored:
adb push /system/media