[Yocto-BBB] 10. Booting from eMMC
Translated from the Vietnamese original; wording may still be rough. Read the original →
In this post I show you how to configure the Beaglebone Black to boot from eMMC.
1. Why
1.1 What is eMMC?
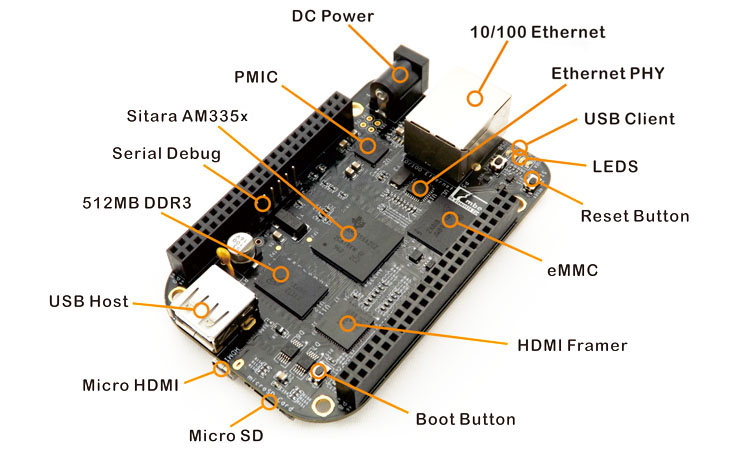
eMMC (embedded MultiMediaCard) is a type of integrated storage that combines NAND flash and a controller on the same chip.
It is like an upgraded version of a removable memory card/flash, but soldered directly onto the board. Read/write speed depends on the standard (usually from ~100MB/s to ~400MB/s with eMMC 5.1).
1.2 Why I use eMMC
There are 2 main reasons I want to boot the Beaglebone Black from eMMC
- By default, when S2 is not pressed the BBB boots from eMMC, and to boot from the SD card you have to hold S2. And I am too lazy to do that.
- It saves an sd card, since the board already has storage for the image.
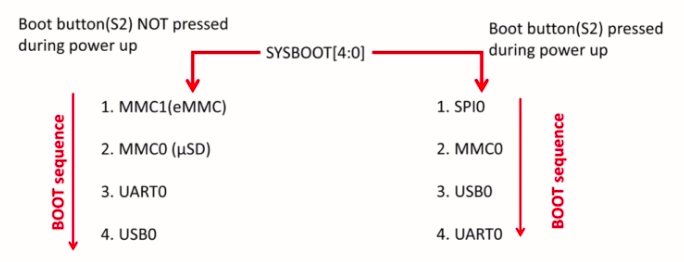
The picture above describes in detail the BBB boot options with and without pressing S2
First I will show you the simplest way, for lazy people who don't want to follow the whole post and still use a micro SD card, but without holding S2
2. The lazy way
As seen in the picture above, if you don't hold S2, the order is eMMC, uSD card, UART0, USB0.
So how do we skip the eMMC and jump to the uSD card automatically?
We completely wipe the original eMMC data. Simple, right? If the BBB cannot find a boot partition on the eMMC, it automatically moves on to option 2.
2.1 Build core-minimal-image with packages for working with the emmc
First, to keep the image small and quick to copy, I use core-image-minimal with a few needed packages preinstalled.
IMAGE_INSTALL:append = " \
  bash \
  coreutils \
  util-linux util-linux-lsblk util-linux-fdisk util-linux-sfdisk util-linux-partx util-linux-findmnt \
  e2fsprogs e2fsprogs-e2fsck e2fsprogs-resize2fs e2fsprogs-tune2fs e2fsprogs-mke2fs \
  dosfstools \
  parted \
  rsync \
  tar gzip xz \
  pv \
  u-boot-tools \
  mmc-utils \
"
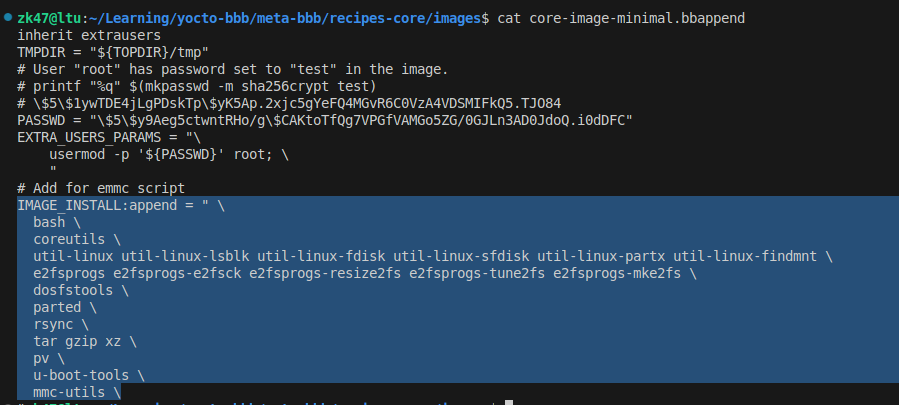
I create core-image-minimal.bbappend and add the following packages. User = root, password = test.
After building, flash it to the SD card, boot and check
root@beaglebone:~# lsblk
NAME         MAJ:MIN RM  SIZE RO TYPE MOUNTPOINTS
mmcblk0      179:0    0  7.4G  0 disk
|-mmcblk0p1  179:1    0  128M  0 part
`-mmcblk0p2  179:2    0   68M  0 part /
mmcblk1      179:256  0  3.6G  0 disk
mmcblk1boot0 179:512  0    2M  1 disk
mmcblk1boot1 179:768  0    2M  1 disk
I use an 8gb SD card, and as you can see we also have mmcblk1, which is the eMMC, 3.6gb in size
2.2 Wiping the eMMC
By default, when you buy a new BBB, the eMMC is flashed with a debian image. So we have to wipe it.
dd if=/dev/zero of=/dev/mmcblk1 bs=4M status=progress conv=fsync
I write zeros over the whole mmcblk1. This takes about 2-3 minutes
From now on you only need to plug in the sd card; no more holding S2, and the board still boots from the sd card automatically.
3. Copying the image from the uSD card to eMMC
Okay, now back to the proper way: once we have a finished image, we copy it to the eMMC and no longer need the sd card.
3.1 Create partitions on the eMMC
Basically, whatever the sd card looks like, I do the same on the eMMC
root@beaglebone:~# lsblk
NAME         MAJ:MIN RM  SIZE RO TYPE MOUNTPOINTS
mmcblk0      179:0    0  7.4G  0 disk
|-mmcblk0p1  179:1    0  128M  0 part
`-mmcblk0p2  179:2    0   68M  0 part /
mmcblk1      179:256  0  3.6G  0 disk
mmcblk1boot0 179:512  0    2M  1 disk
mmcblk1boot1 179:768  0    2M  1 disk
We create mmcblk1p1 for boot and mmcblk1p2 for root, just like mmcblk0
set -e
src=/dev/mmcblk0
dst=/dev/mmcblk1
umount ${dst}p* || true
swapoff -a || true

# wipe first MiB to avoid old signatures
dd if=/dev/zero of=${dst} bs=1M count=8 conv=fsync

# DOS partition table with 2 partitions
parted -s ${dst} mklabel msdos
parted -s ${dst} unit MiB mkpart primary fat32 1 129
parted -s ${dst} set 1 boot on
parted -s ${dst} unit MiB mkpart primary ext4 129 100%

# tell kernel
partprobe ${dst}
sleep 1
- umount to unmount the eMMC
- swapoff to turn off swap
- parted to create the partitions
- partprobe to tell the kernel the partitions changed
- set 1 boot on: turn on the boot flag for the partition
3.2 Make filesystems and mount
# Make filesystems (label them to simplify fstab)
mkfs.vfat -F 32 -n BOOT ${dst}p1
mkfs.ext4 -L ROOT ${dst}p2

mkdir -p /mnt/srcboot /mnt/srcroot /mnt/dstboot /mnt/dstroot

# Source (SD)
mount ${src}p1 /mnt/srcboot
mount ${src}p2 /mnt/srcroot

# Target (eMMC)
mount ${dst}p1 /mnt/dstboot
mount ${dst}p2 /mnt/dstroot
3.3 Copy the root file system and boot
Here we don't copy the whole root file system of the sd card; we exclude folders such as
/run,/var/volatile,/tmp→ runtime tmpfs./dev,/proc,/sys→ created by the kernel/udev at boot- /boot/* → to avoid conflicting with the boot partition
rsync -aHAXx --numeric-ids \
  --exclude='/boot/*' \
  --exclude='/dev/*' --exclude='/proc/*' --exclude='/sys/*' \
  --exclude='/tmp/*' --exclude='/run/*' --exclude='/var/volatile/*' \
  /mnt/srcroot/ /mnt/dstroot/

rsync -aHAX /mnt/srcboot/ /mnt/dstboot/
sync
3.4 Edit /etc/fstab on the eMMC
fstab is the file system table; basically we define the label, mountpoint, type and options for it
# Create/replace fstab on target
cat >/mnt/dstroot/etc/fstab
LABEL=BOOT     /boot        vfat   defaults,ro,utf8  0  2
LABEL=ROOT   /            ext4   defaults           0  1
tmpfs          /run         tmpfs  mode=0755,nosuid,nodev,size=50% 0 0
tmpfs          /var/volatile tmpfs defaults,size=50% 0 0
EOF

sync
3.5 Edit /boot/extlinux/extlinux.conf
This file currently contains the following
root@beaglebone:/mnt/dstboot/extlinux# cat extlinux.conf
# Generic Distro Configuration file generated by OpenEmbedded
LABEL Poky (Yocto Project Reference Distro)
	KERNEL ../zImage
	FDTDIR ../
    APPEND root=PARTUUID=${uuid} rootfstype=ext4 rootwait rw earlycon console=ttyS0,115200n8
Normally the uuid would be set in uEnv.txt, but I have not configured that yet and don't want to make this post any more complicated, so here I hard-code the block uuid
root@beaglebone:/mnt/dstboot/extlinux# tune2fs -L rootfs /dev/mmcblk1p2
tune2fs 1.46.5 (30-Dec-2021)
root@beaglebone:/mnt/dstboot/extlinux# blkid -s PARTUUID -o value /dev/mmcblk1p2
0cebe1df-02
Okay, so we put the blkid of /dev/mmcblk1p2 into extlinux.conf
root@beaglebone:/mnt/dstboot/extlinux# cat extlinux.conf
# Generic Distro Configuration file generated by OpenEmbedded
LABEL Poky (Yocto Project Reference Distro)
	KERNEL ../zImage
	FDTDIR ../
    APPEND root=PARTUUID=0cebe1df-02 rootfstype=ext4 rootwait rw earlycon console=ttyS0,115200n8
Okay, we have finished all the copy steps. Now we can pull out the micro SD card and use the eMMC normally :v
Explaining every single command would take a while, so you can check the linux manual to understand each one better. If you have any trouble, leave a comment below.
In the next post I will write about sending and receiving files to the board over UART
Hope you keep supporting and reading :vv!!