[Yocto-STM32MP1] 1. Build and flash core-image-minimal for the STM32MP157
Translated from the Vietnamese original; wording may still be rough. Read the original →
1. Preparing the host machine
My machine runs Ubuntu 22.04.5 LTS (Jammy Jellyfish). I installed it dual boot with windows to make the most of the cores
Following the Yocto Project Reference Manual , section 1.3.2.1, we install the following packages
sudo apt-get install gawk wget git-core diffstat unzip texinfo gcc-multilib \
build-essential chrpath socat cpio python3 python3-pip python3-pexpect \
libsdl1.2-dev xterm make xsltproc docbook-utils fop dblatex xmlto
2. Configuring the build environment
1.1 Clone the poky source and the needed meta-layers
First we clone the poky source (the Yocto project's reference distribution), branch Scarthgap
git clone -b scarthgap git://git.yoctoproject.org/poky.git
Then we clone the source code of meta-st-stm32mp, ST's official meta layer
git clone -b scarthgap https://github.com/STMicroelectronics/meta-st-stm32mp.git
1.2 Edit bblayers.conf and local.conf
We initialise the build environment
source poky/oe-init-build-env build-stm32mp1
We read the README in this repo, where ST describes which layers we need to add for the build (https://github.com/STMicroelectronics/meta-st-stm32mp/blob/scarthgap/README.md )
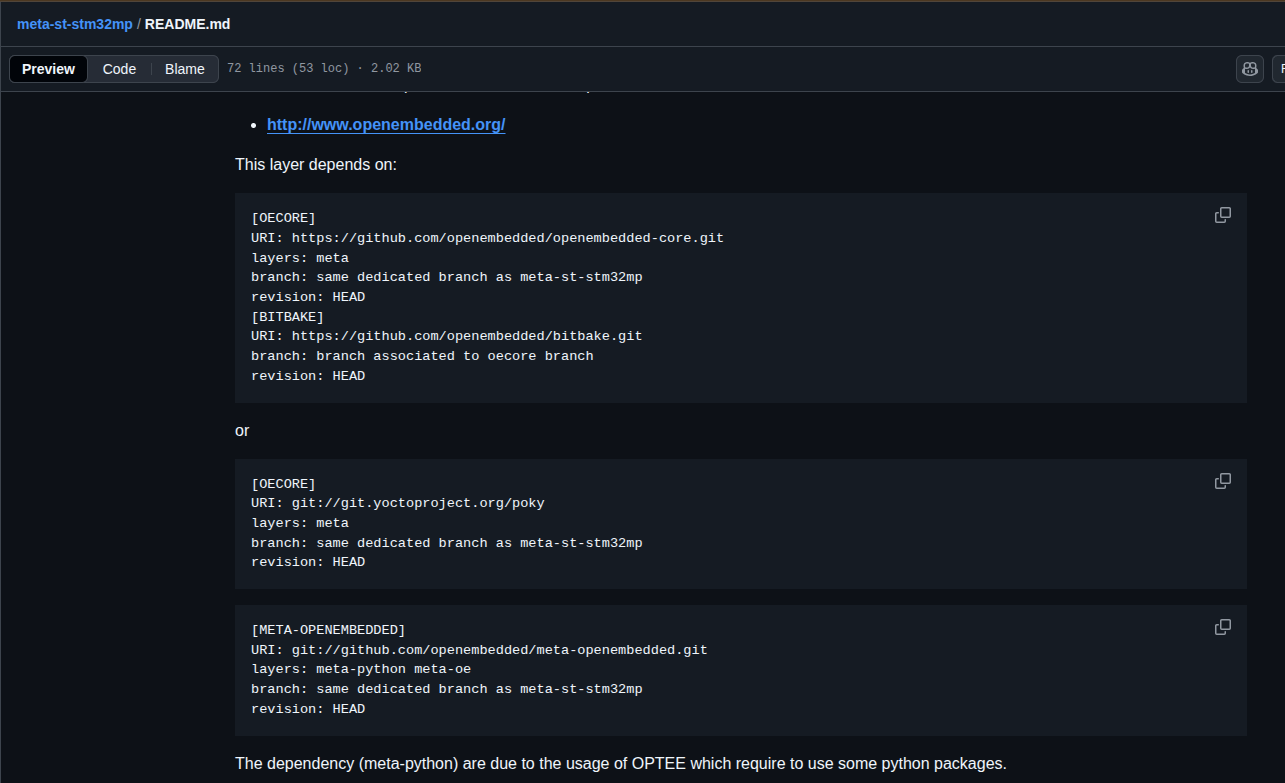
So we clone the sources and add these layers to conf/bblayers.conf
git clone -b scarthgap git://git.openembedded.org/meta-openembedded
# POKY_BBLAYERS_CONF_VERSION is increased each time build/conf/bblayers.conf
# changes incompatibly
POKY_BBLAYERS_CONF_VERSION = "2"
BBPATH = "${TOPDIR}"
BBFILES ?= ""
BBLAYERS ?= " \
  /home/zk47/Learning/yocto-mp1/poky/meta \
  /home/zk47/Learning/yocto-mp1/poky/meta-poky \
  /home/zk47/Learning/yocto-mp1/poky/meta-yocto-bsp \
  /home/zk47/Learning/yocto-mp1/meta-openembedded/meta-oe \
  /home/zk47/Learning/yocto-mp1/meta-openembedded/meta-python \
  /home/zk47/Learning/yocto-mp1/meta-st-stm32mp \
  "
Next we check the conf/machine/stm32mp1.conf file in the layer to know what to set the machine to, then we edit conf/local.conf
MACHINE = "stm32mp1"
# Configure xz (for low-end host machines with low RAM and lots of swap)
# XZ_DEFAULTS = "--memlimit=1500MiB"
Following the Digikey guide, we can enable "XZ_DEFAULTS = "--memlimit=1500MiB"" if the host has little RAM; my machine has plenty of RAM and swap, so I comment this line out
Okay, now we run source; I choose build-stm32mp1 as the builddir
Okay, let's build
bitbake core-image-minimal
3. Flashing the SD card with the built image
3.1 Preparing the SD card
We plug in the SD card and unmount its current partitions. We check with the lsblk command
mmcblk0     179:0    0  29,2G  0 disk
├─mmcblk0p1 179:1    0   128M  0 part /media/zk47/boot
└─mmcblk0p2 179:2    0 132,4M  0 part /media/zk47/root
My SD card has 2 partitions as above; yours may show sda1 or sdb1. Unmount them
sudo umount /media/zk47/root
sudo umount /media/zk47/boot
3.2 Flashing
Before flashing you should know about the STM32 flash layout; read more about it here STM32MP1-Software-Platform_boot_BOOT
And watch the first 11 minutes of the Digikey tutorial video Introduction to Embedded Linux Part 3 - Flash SD Card and Boot Process | Digi-Key Electronics
Okay, after watching it you will have the basics; as for the flashing itself, following the Digikey guide you get pulled into fixing partitions, which I think is hard for beginners
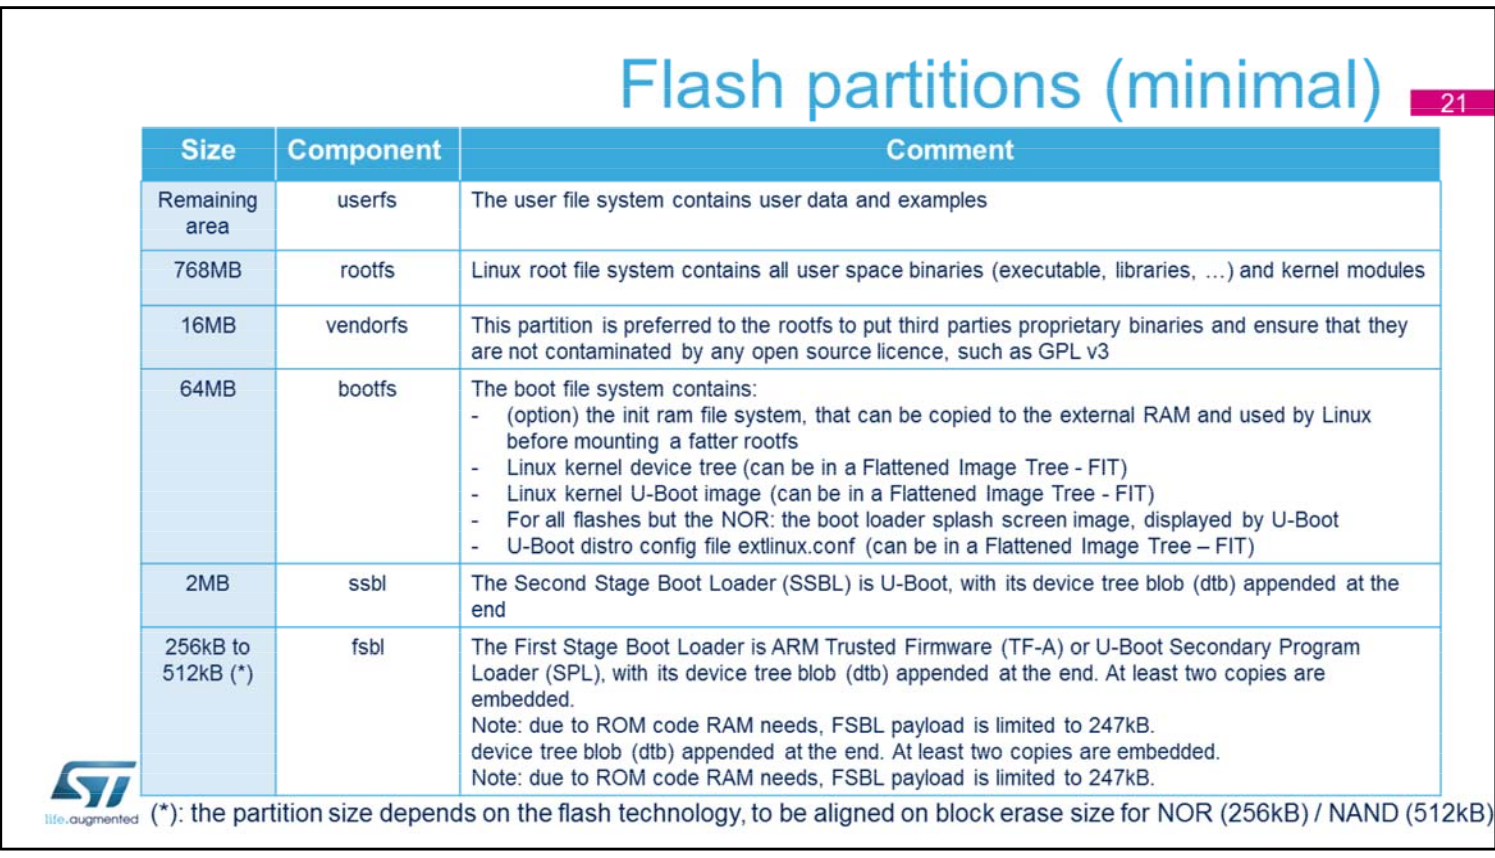
Basically we have the following partitions.
We use ST's ready-made script to create the partitions; we go to the folder build-stm32mp1/tmp/deploy/images/stm32mp1
sudo ./scripts/create_sdcard_from_flashlayout.sh ./flashlayout_core-image-minimal/optee/FlashLayout_sdcard_stm32mp157d-dk1-optee.tsv
That is, you run the script with one parameter, the layout.tsv (here I choose optee; you don't need to understand the differences yet, just flash first :vv)
After it finishes, we then run the very line printed in the terminal after "To put this raw image on sdcard:"
sudo dd if=/home/zk47/Youtube/Yocto/yocto-stm32mp1/build-stm32mp1/tmp/deploy/images/stm32mp1/flashlayout_core-image-minimal/optee/../../FlashLayout_sdcard_stm32mp157d-dk1-optee.raw of=/dev/mmcblk0 bs=8M conv=fdatasync status=progress
Pull the SD card out and plug it back in.
Okay, now we have partitions according to that tsv file, and the tsv file also tells us which file goes where; look at the last 4 lines.
P	0x10	bootfs	System	mmc0	0x00984400	st-image-bootfs-poky-stm32mp1.bootfs.ext4
P	0x11	vendorfs	FileSystem	mmc0	0x04984400	st-image-vendorfs-poky-stm32mp1.vendorfs.ext4
P	0x12	rootfs	FileSystem	mmc0	0x05984400	core-image-minimal-stm32mp1.rootfs.ext4
P	0x13	userfs	FileSystem	mmc0	0x105984400	st-image-userfs-poky-stm32mp1.userfs.ext4
Just as suggested, we copy these files into the partitions, but only rootfs and bootfs are needed for the board to boot; remember to unmount these 2 partitions first
zk47@ltu:~/Youtube/Yocto/yocto-stm32mp1/build-stm32mp1/tmp/deploy/images/stm32mp1$ sudo dd if=core-image-minimal-stm32mp1.rootfs.ext4 of=/dev/mmcblk0p10 bs=1M status=progress
zk47@ltu:~/Youtube/Yocto/yocto-stm32mp1/build-stm32mp1/tmp/deploy/images/stm32mp1$ sudo dd if=st-image-bootfs-poky-stm32mp1.bootfs.ext4 of=/dev/mmcblk0p8 bs=1M status=progress
zk47@ltu:~/Youtube/Yocto/yocto-stm32mp1/build-stm32mp1/tmp/deploy/images/stm32mp1$ sync
Okay, pull the SD card out and plug it into the board
With the STM32MP157, after plugging in st-link it shows up at /dev/ttyACM0
sudo picocom -b 115200 /dev/ttyACM0
Here is the result
Poky (Yocto Project Reference Distro) 5.0.13 stm32mp1 /dev/ttySTM0
stm32mp1 login: root
WARNING: Poky is a reference Yocto Project distribution that should be used for
testing and development purposes only. It is recommended that you create your
own distribution for production use.
In the next post I will show you how to create a Device Tree patch to enable I2C
Your support and contributions are very welcome !!