[Yocto-STM32MP1] 2. Creating a kernel device tree patch, enabling i2c
Translated from the Vietnamese original; wording may still be rough. Read the original →
In this post I show you how to create a kernel device tree patch to enable i2c5 on the board
1. Documents and hardware
Read the vendor's User Manual ; page 8 has the Hardware block diagram, showing the connections currently routed out from the chip
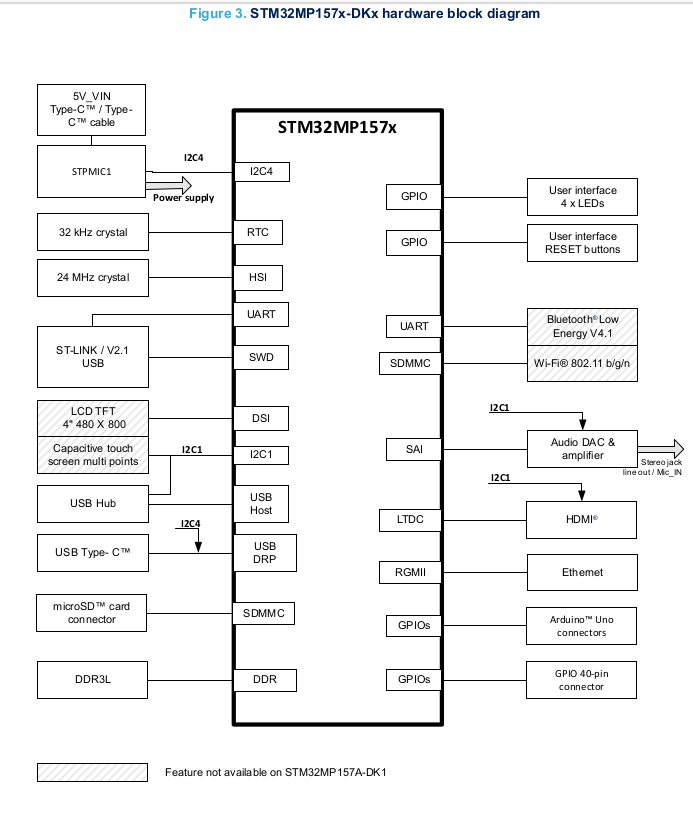
We see i2c1 and i2c4 are already used for other peripherals
Continue to page 31 to read about the GPIOs in more detail
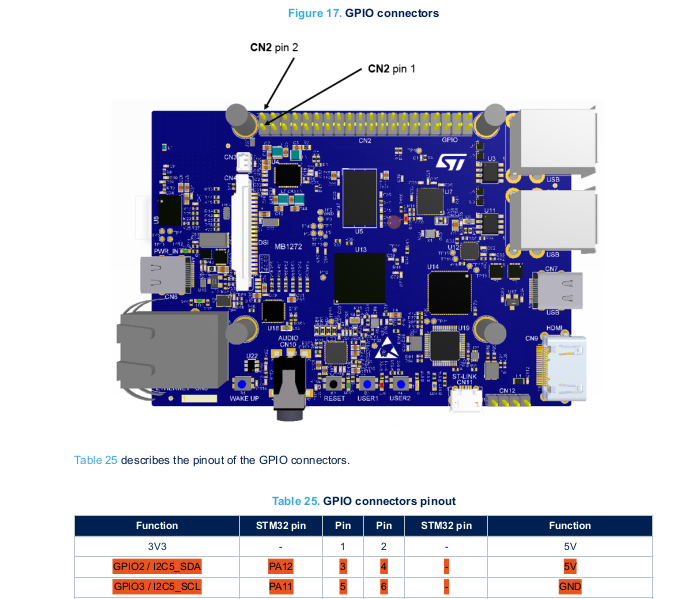
So we see pins PA12 and PA11 are routed out; they are the SDA and SCL pins of i2c5 on the board.
Now let's check whether i2c5 is enabled, similar to the post [Yocto-BBB] 8. Connecting an SSD1306 0.96 inch OLED over I2C . On core-image-minimal we check
root@stm32mp1:~# ls -l /dev/i2c*
crw-------    1 root     root       89,   0 Jan  1  2000 /dev/i2c-0
crw-------    1 root     root       89,   1 Jan  1  2000 /dev/i2c-1
crw-------    1 root     root       89,   2 Jan  1  2000 /dev/i2c-2
root@stm32mp1:~# ls /sys/bus/i2c/devices/
0-0039  0-004a  1-0028  1-0033  i2c-0   i2c-1   i2c-2
root@stm32mp1:~# ls -l /sys/bus/i2c/devices/
lrwxrwxrwx    1 root     root             0 Jan  1  2000 0-0039 -> ../../../devices/platform/soc/5c007000.bus/40012000.i2c/i2c-0/0-0039
lrwxrwxrwx    1 root     root             0 Jan  1  2000 0-004a -> ../../../devices/platform/soc/5c007000.bus/40012000.i2c/i2c-0/0-004a
lrwxrwxrwx    1 root     root             0 Jan  1  2000 1-0028 -> ../../../devices/platform/soc/5c007000.bus/5c002000.i2c/i2c-1/1-0028
lrwxrwxrwx    1 root     root             0 Jan  1  2000 1-0033 -> ../../../devices/platform/soc/5c007000.bus/5c002000.i2c/i2c-1/1-0033
lrwxrwxrwx    1 root     root             0 Jan  1  2000 i2c-0 -> ../../../devices/platform/soc/5c007000.bus/40012000.i2c/i2c-0
lrwxrwxrwx    1 root     root             0 Jan  1  2000 i2c-1 -> ../../../devices/platform/soc/5c007000.bus/5c002000.i2c/i2c-1
lrwxrwxrwx    1 root     root             0 Jan  1  2000 i2c-2 -> ../../../devices/platform/soc/5c007000.bus/40012000.i2c/i2c-0/i2c-2
What we need to look at is the i2c addresses. So there are 2 i2c buses enabled
40012000.i2c
40012000.i2c
5c002000.i2c
5c002000.i2c
40012000.i2c
5c002000.i2c
40012000.i2c
Go to the Reference manual, Table 9 in 2.5.2 Memory Map and register boundary addresses. We see these are exactly i2c1 and i2c4 mentioned above.


So now we need to enable i2c5

2. Checking the device tree after the build
2.1 Creating the patch
Let's check the set of device tree outputs to see what we have
zk47@zk47-ltu:~/Learning/yocto-mp1/build-mp1$ find . -name "stm32mp157d-dk1.dts"
./tmp/work/x86_64-linux/tf-a-tools-native/v2.10.13-stm32mp-r2/git/fdts/stm32mp157d-dk1.dts
./tmp/work/x86_64-linux/tf-a-tools-native/v2.10.13-stm32mp-r2/git/.pc/0001-v2.10-stm32mp-r2.patch/fdts/stm32mp157d-dk1.dts
./tmp/work/x86_64-linux/u-boot-tools-stm32mp-native/v2023.10-stm32mp-r2/git/.pc/0001-v2023.10-stm32mp-r2.patch/arch/arm/dts/stm32mp157d-dk1.dts
./tmp/work/x86_64-linux/u-boot-tools-stm32mp-native/v2023.10-stm32mp-r2/git/arch/arm/dts/stm32mp157d-dk1.dts
./tmp/work/stm32mp1-poky-linux-gnueabi/optee-os-stm32mp/4.0.0-stm32mp-r2/git/core/arch/arm/dts/stm32mp157d-dk1.dts
./tmp/work/stm32mp1-poky-linux-gnueabi/optee-os-stm32mp/4.0.0-stm32mp-r2/git/.pc/0001-4.0.0-stm32mp-r2.patch/core/arch/arm/dts/stm32mp157d-dk1.dts
./tmp/work-shared/stm32mp1/uboot-source/.pc/0001-v2023.10-stm32mp-r2.patch/arch/arm/dts/stm32mp157d-dk1.dts
./tmp/work-shared/stm32mp1/uboot-source/arch/arm/dts/stm32mp157d-dk1.dts
./tmp/work-shared/stm32mp1/kernel-source/.pc/0001-v6.6-stm32mp-r2.patch/arch/arm/boot/dts/st/stm32mp157d-dk1.dts
./tmp/work-shared/stm32mp1/kernel-source/arch/arm/boot/dts/st/stm32mp157d-dk1.dts
./tmp/work-shared/stm32mp1/tfa-source/fdts/stm32mp157d-dk1.dts
./tmp/work-shared/stm32mp1/tfa-source/.pc/0001-v2.10-stm32mp-r2.patch/fdts/stm32mp157d-dk1.dts
We look at the main files and check whether anything relates to i2c5
/home/zk47/Learning/yocto-mp1/build-mp1/tmp/work-shared/stm32mp1/kernel-source/arch/arm/boot/dts/st/stm32mp157d-dk1.dts

/home/zk47/Learning/yocto-mp1/build-mp1/tmp/work-shared/stm32mp1/kernel-source/arch/arm/boot/dts/st/stm32mp157d-dk1.dts
And then
/home/zk47/Learning/yocto-mp1/build-mp1/tmp/work-shared/stm32mp1/kernel-source/arch/arm/boot/dts/st/stm32mp15xx-dkx.dtsi
In this file we see
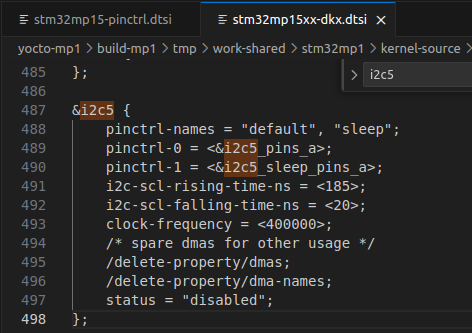
The current status is disabled, so we need to change it to "okay"
So we add the following block to the file stm32mp157d-dk1.dts
&i2c5 {
	pinctrl-names = "default", "sleep";
	pinctrl-0 = ;
	pinctrl-1 = ;
	i2c-scl-rising-time-ns = ;
	i2c-scl-falling-time-ns = ;
	clock-frequency = ;
	status = "okay";
};
We use a trick: copy that file into a folder and duplicate it. Name the original stm32mp157d-dk1.dts.orig, and the edited copy with the i2c5 node stm32mp157d-dk1.dts.
Now we run the command
git diff --no-index stm32mp157d-dk1.dts.orig stm32mp157d-dk1.dts > 0001-add-i2c-userspace-sts.patch
However, this patch uses paths relative to the current folder, so we need to fix the path to match the linux source. We change the patch to the following
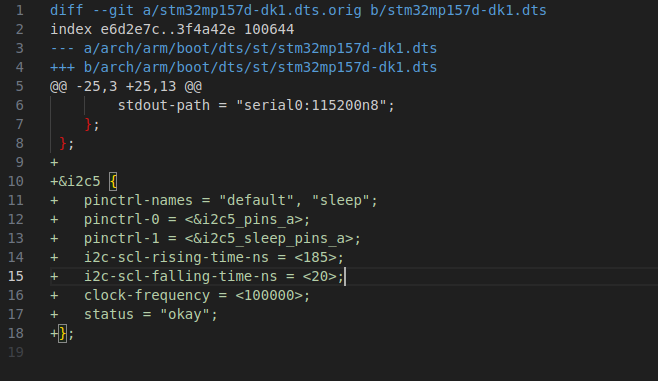
So we have the patch; now we need to create a meta-layer and a kernel recipe
2.2 Creating the meta-layer and kernel recipe
Here I create meta-stm32mp1 for customisations, with the following folder structure
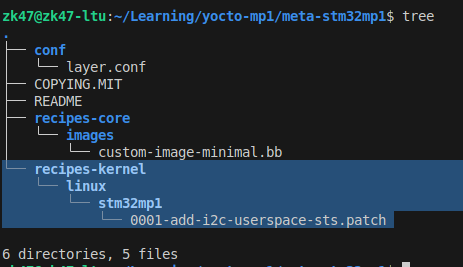
But we don't know the name of the kernel recipe yet, which we need in order to add a bbappend for it. So we check with the command
zk47@zk47-ltu:~/Learning/yocto-mp1/build-mp1$ oe-pkgdata-util lookup-recipe kernel
linux-stm32mp
Okay, now we create linux-stm32mp_%.bbappend and that's it
zk47@zk47-ltu:~/Learning/yocto-mp1/build-mp1$ cat /home/zk47/Learning/yocto-mp1/meta-stm32mp1/recipes-kernel/linux/linux-stm32mp_%.bbappend
FILESEXTRAPATHS_prepend := "${THISDIR}/stm32mp1:"
SRC_URI += "file://0001-add-i2c-userspace-dts.patch"
And to make debugging i2c easier, we add the following to core-image-minimal.bbappend
IMAGE_INSTALL:append = " i2c-tools"
3. Checking i2c on the board
After changing the configs above we rebuild
bitbake core-image-minimal
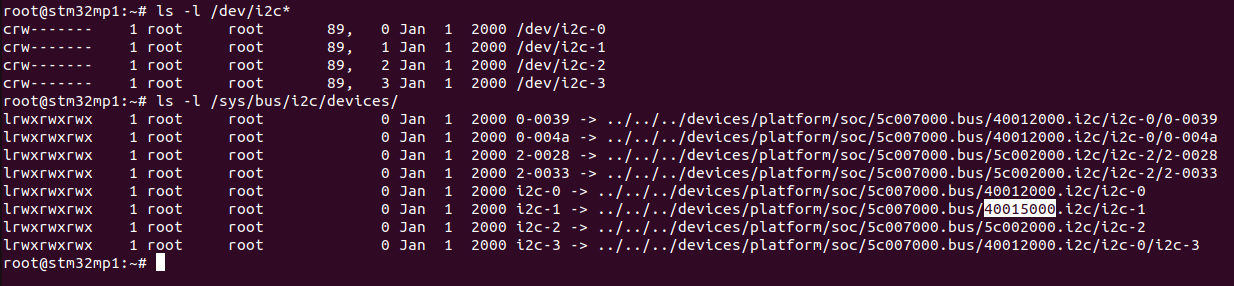
Now checking i2c5, we see i2c enabled at address 40015000, which is i2c5
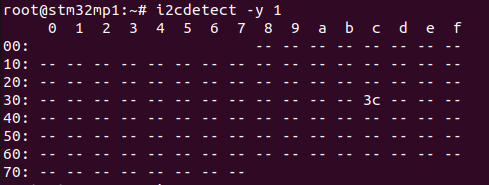
And we also have the i2c tools; we plug in the ssd1306 and test

You can continue programming the ssd1306 i2c screen; see the post [Yocto-BBB] 8. Connecting an SSD1306 0.96 inch OLED over I2C
Good luck with the hands-on !!