[Kernel-QEMU] 1. KGDB debugging from start_kernel with a VS Code interface
Translated from the Vietnamese original; wording may still be rough. Read the original →
As I said in the Kernel-BBB 2 post, without JTAG on the BBB we probably cannot debug the kernel from the very first line. So I am turning to QEMU to have full control over the code.
Oh, in this post I clone the sources and build the related components, no Yocto this time (If yocto is my strength, what am i without Yocto :vv Haha)
1. Install the needed packages
Wandering through the Prerequisites of each project, we get the needed packages. Here I need a cross-compiler, the kernel, QEMU, busybox, gdb-multiarch
# Cross-compiler arm64
sudo apt-get install -y gcc-aarch64-linux-gnu

# Build tools kernel
sudo apt-get install -y build-essential flex bison libssl-dev libelf-dev \
    bc dwarves pahole

# Build tools QEMU
sudo apt-get install -y ninja-build pkg-config libglib2.0-dev libpixman-1-dev \
    python3-venv

# GDB multiarch (debug cross-arch)
sudo apt-get install -y gdb-multiarch
2. Clone and build the source code
2.1 Linux kernel (linux-next)
2.1.1 Clone the Linux Kernel
I clone the kernel development tree, a full clone. Or you can clone mainline linux
mkdir -p ~/kernel-qemu/ && cd ~/kernel-qemu

git clone --depth 1 https://git.kernel.org/pub/scm/linux/kernel/git/next/linux-next.git

cd  linux-next
2.1.2 Configure and build
We create the defconfig
make ARCH=arm64 CROSS_COMPILE=aarch64-linux-gnu- defconfig
Next we enable the config for kgdb and the features that support debugging
./scripts/config --enable DEBUG_INFO
./scripts/config --enable DEBUG_INFO_DWARF5
./scripts/config --enable GDB_SCRIPTS
./scripts/config --enable FRAME_POINTER
./scripts/config --enable KGDB
./scripts/config --enable KGDB_SERIAL_CONSOLE
./scripts/config --enable DEBUG_KERNEL

./scripts/config --disable RANDOMIZE_BASE
./scripts/config --enable EARLY_PRINTK
./scripts/config --enable DYNAMIC_DEBUG
./scripts/config --enable FTRACE
./scripts/config --enable MAGIC_SYSRQ
./scripts/config --enable DETECT_HUNG_TASK
./scripts/config --enable PROVE_LOCKING
Then build (if it asks you to choose anything, just keep pressing Enter for now)
make ARCH=arm64 CROSS_COMPILE=aarch64-linux-gnu- -j$(nproc)
The first build takes quite a while; note these 2 output files
arch/arm64/boot/Image    ← Binary kernel image (QEMU loads this file)
vmlinux                  ← ELF with debug symbols (GDB uses this file)
2.2 QEMU
2.2.1 Clone QEMU
mkdir -p ~/kernel-qemu/ && cd ~/kernel-qemu

git clone https://gitlab.com/qemu-project/qemu.git
cd qemu

git submodule update --init --recursive
2.2.2 Build QEMU for aarch64
cd ~/kernel-qemu/qemu

mkdir -p build-aarch64 && cd build-aarch64
../configure --target-list=aarch64-softmmu --enable-debug

make -j$(nproc)
After building, the output is at
~/kernel-qemu/qemu/build-aarch64/qemu-system-aarch64
We check it with
~/kernel-qemu/qemu/build-aarch64/qemu-system-aarch64 --version
2.3 BusyBox
Clone and configure the build
cd ~/kernel-qemu

git clone https://git.busybox.net/busybox
cd busybox

# Default config
make ARCH=arm64 CROSS_COMPILE=aarch64-linux-gnu- defconfig

sed -i 's/# CONFIG_STATIC is not set/CONFIG_STATIC=y/' .config

# Build
make ARCH=arm64 CROSS_COMPILE=aarch64-linux-gnu- -j$(nproc)

make ARCH=arm64 CROSS_COMPILE=aarch64-linux-gnu- install
The output is now in _install/
3. Create the root filesystem and pack it into an initramfs
I have also shown you how to create a root filesystem by hand in Boot-BBB 4 ; you can go back to that series to understand it better.
cd ~/kernel-qemu/

mkdir -p initramfs/{bin,sbin,etc,proc,sys,dev,tmp,usr/bin,usr/sbin}

cp -a busybox/_install/* initramfs/

cat > initramfs/init  ../initramfs.cpio.gz
cd ..
Basically it creates the root folder structure, the mkdir commands at the start
Then it creates the init script, mounts the pseudo filesystems, then runs /bin/sh to get a shell
Here initramfs is the init RAM filesystem. That is, I pack it into a cpio, and at runtime the root file system is extracted straight into RAM. On the BBB I had an SD card with real partitions, so I created real files. Here in QEMU I don't give it a separate partition, so keeping the RFS in RAM is simpler.
4. Starting QEMU
That is enough to try debugging with QEMU
~/kernel-qemu/qemu/build-aarch64/qemu-system-aarch64 \
    -machine virt \
    -cpu cortex-a57 \
    -nographic \
    -smp 1 \
    -m 512M \
    -kernel ~/kernel-qemu/linux-next/arch/arm64/boot/Image \
    -initrd ~/kernel-qemu/initramfs.cpio.gz \
    -append "console=ttyAMA0 nokaslr" \
    -s -S
- -machine virt: a virtual platform defined by QEMU itself, not emulating any real board
- -cpu cortex-a57: CPU model (aarch64)
- -nographic: no GUI, CLI only :vv
- -smp 1: Symmetric Multi-Processing, just 1 core; after learning context switching between cores I will raise it to 2, 4 later :vv
- -m 512M: 512MB RAM
- -kernel ...IMAGE: loads the kernel directly into RAM, skipping the bootloader. I will show how to use u-boot as well in later posts
- -initrd: loads the initramfs
- append: kernel command line
- -s: -gdb tcp::1234, the default port
- -S: freezes the CPU right at startup; the CPU executes no instructions until GDB connects
And from another terminal you run gdb
cd ~/kernel-qemu/linux-next
gdb-multiarch vmlinux
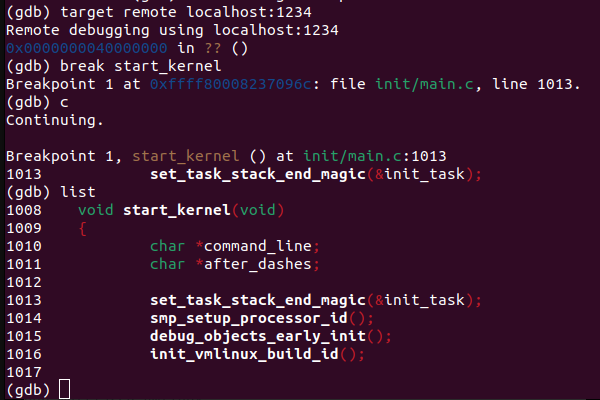
Then type the commands as in the picture below
target remote localhost:1234
break start_kernel
continue
list
5. Setting up launch.json in VS Code
Go into the linux-next folder again and create a launch.json, very much like in Yocto-BBB 18
Here I open the folder and create .vscode/launch.json
(remember to change sourceFileMap to the actual path where you cloned linux-next)
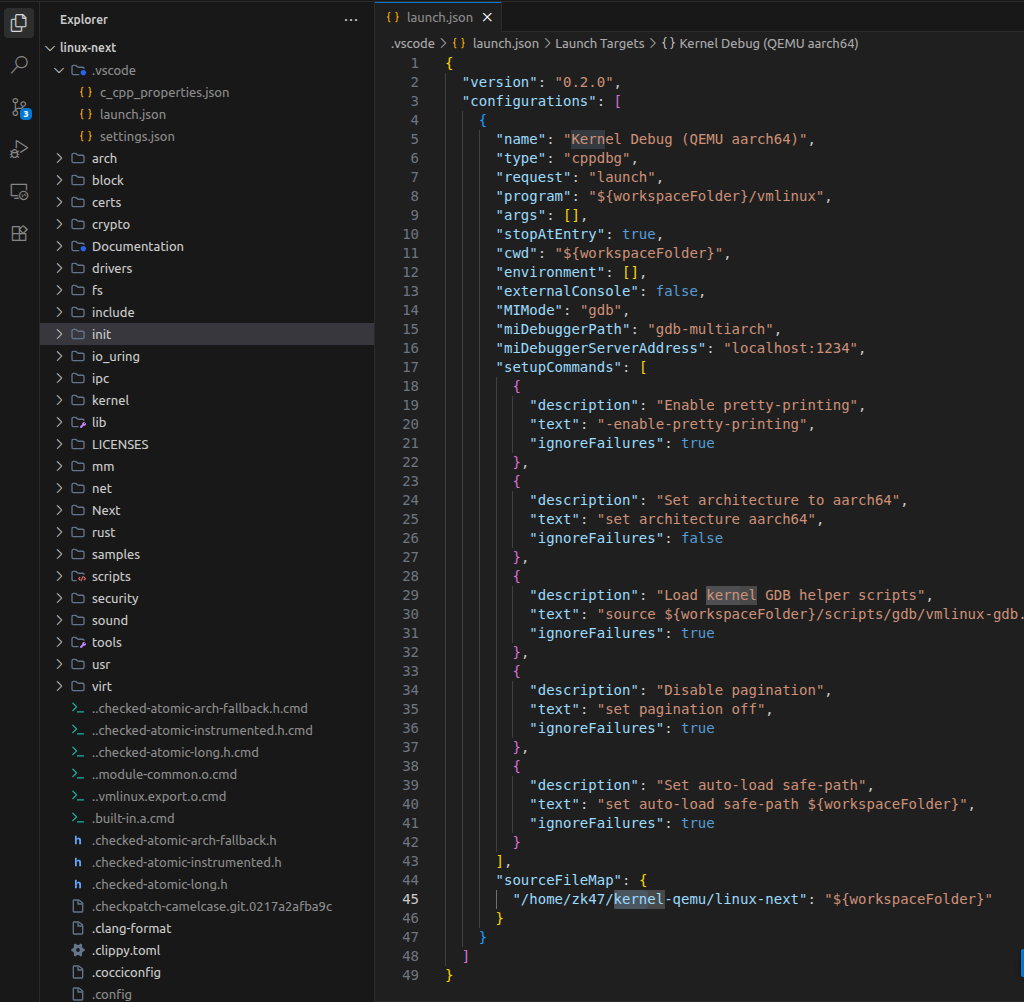
The content is as follows
{
  "version": "0.2.0",
  "configurations": [
    {
      "name": "Kernel Debug (QEMU aarch64)",
      "type": "cppdbg",
      "request": "launch",
      "program": "${workspaceFolder}/vmlinux",
      "args": [],
      "stopAtEntry": true,
      "cwd": "${workspaceFolder}",
      "environment": [],
      "externalConsole": false,
      "MIMode": "gdb",
      "miDebuggerPath": "gdb-multiarch",
      "miDebuggerServerAddress": "localhost:1234",
      "setupCommands": [
        {
          "description": "Enable pretty-printing",
          "text": "-enable-pretty-printing",
          "ignoreFailures": true
        },
        {
          "description": "Set architecture to aarch64",
          "text": "set architecture aarch64",
          "ignoreFailures": false
        },
        {
          "description": "Load kernel GDB helper scripts",
          "text": "source ${workspaceFolder}/scripts/gdb/vmlinux-gdb.py",
          "ignoreFailures": true
        },
        {
          "description": "Disable pagination",
          "text": "set pagination off",
          "ignoreFailures": true
        },
        {
          "description": "Set auto-load safe-path",
          "text": "set auto-load safe-path ${workspaceFolder}",
          "ignoreFailures": true
        }
      ],
      "sourceFileMap": {
        "/home/zk47/kernel-qemu/linux-next": "${workspaceFolder}"
      }
    }
  ]
}
Now go to init/main.c and set a breakpoint at start_kernel, and you are done
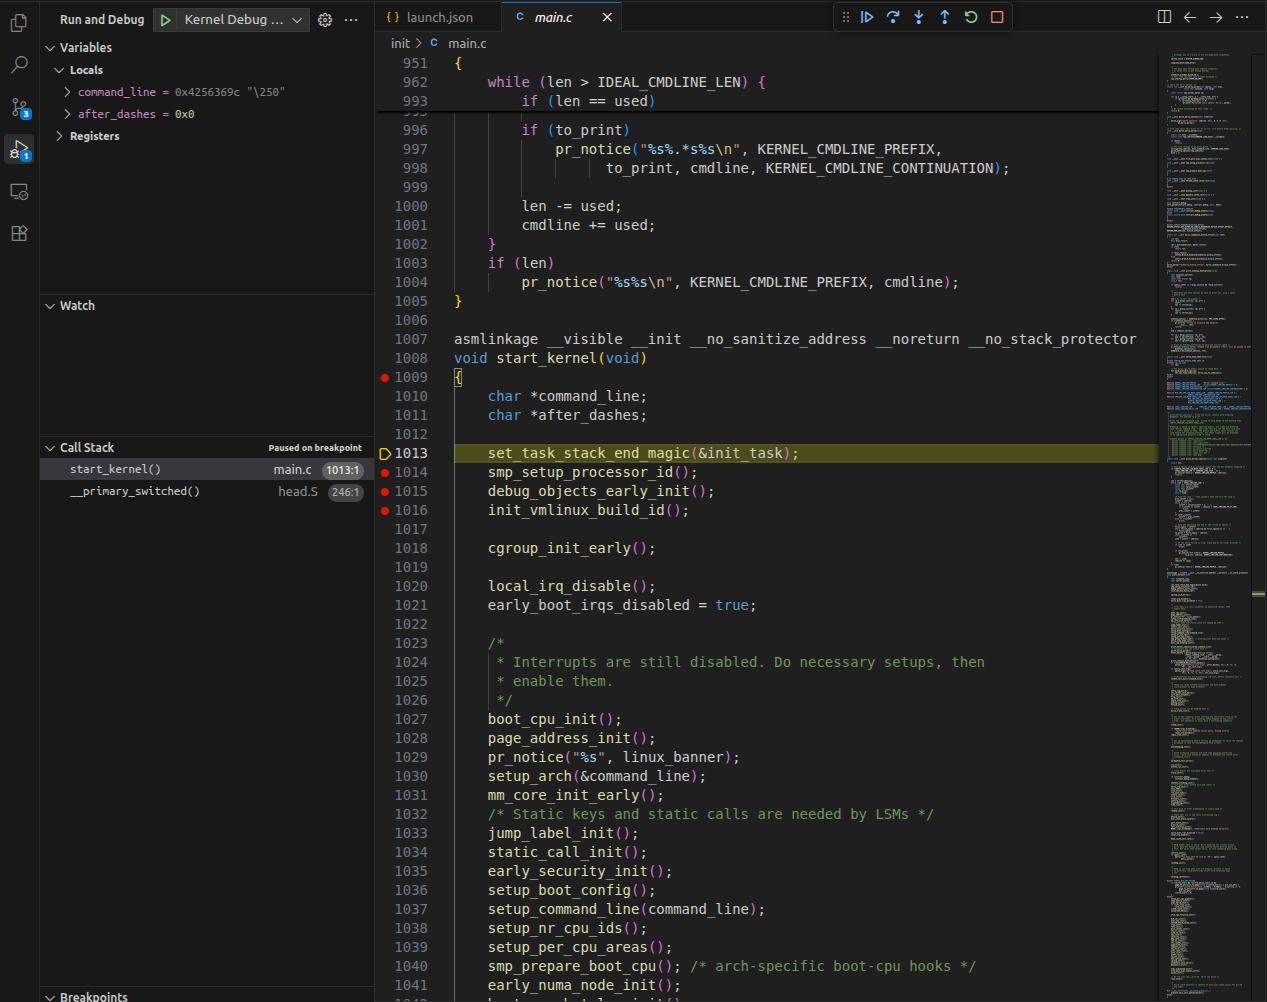
Note: every time you click the button to end the gdb session, qemu also shuts down, so you need to start it again; the same when you click restart
Good luck with the hands-on :vv !!