[Device-Driver-Lichee] 1. Build the image and flash it to the board
Translated from the Vietnamese original; wording may still be rough. Read the original →
Instead of using yocto, which I think is actually quite complicated for beginners, I simplify things by building u-boot and the kernel separately and taking a ready-made root file system to flash to the board. Then we start the Device Driver series without needing to care what yocto is :vv
1. Clone the repo and prepare the host machine
git clone --recurse-submodules https://github.com/Zk47T/Lichee-Nano-Device-Driver.git
cd Lichee-Nano-Device-Driver
Install the packages needed for the build
sudo apt update
sudo apt install -y \
    build-essential git bc flex bison \
    libssl-dev libgnutls28-dev \
    gcc-arm-linux-gnueabi \
    dosfstools u-boot-tools \
    python3
Here I use the arm-linux-gnueabi toolchain (GCC 11) directly, so we need to set the environment variables
export ARCH=arm
export CROSS_COMPILE=arm-linux-gnueabi-
2. Build u-boot
mkdir -p output
make -C u-boot-f1c100s f1c100s_defconfig
make -C u-boot-f1c100s -j$(nproc) PYTHON=python3
cp u-boot-f1c100s/u-boot-sunxi-with-spl.bin output/
I have already created f1c100s_defconfig, so just go ahead and build :vv
The output is at output/u-boot-sunxi-with-spl.bin
3. Build the kernel
make -C linux f1c100s_defconfig
make -C linux -j$(nproc) zImage suniv-f1c100s-licheepi-nano.dtb
cp linux/arch/arm/boot/zImage output/
cp linux/arch/arm/boot/dts/suniv-f1c100s-licheepi-nano.dtb output/
The output is at output/zImage, output/suniv-f1c100s-licheepi-nano.dtb
We also build files/boot.cmd, the kernel command line, and copy it to output
mkimage -C none -A arm -T script -d files/boot.cmd output/boot.scr
Normally, to build a root file system you create the folder structure and may use busybox to get the commands, but here I have also prepared a core-image-minimal-rootfs for you at
files/core-image-minimal-f1c100s.rootfs.tar.xz
I added some handy packages to this rootfs; you can check the manifest file to see what is included
4. Flash to the SD card
lsblk -o NAME,SIZE,TYPE,LABEL          # confirm device name

export DEV=/dev/sda                    # change to your device
[[ "$DEV" =~ [0-9]$ ]] && PART="${DEV}p" || PART="${DEV}"
# sdX  → ${PART}1 = /dev/sda1
# mmcblkX → ${PART}1 = /dev/mmcblk0p1

sudo umount ${PART}1 2>/dev/null
sudo umount ${PART}2 2>/dev/null
Plug in the sd card; note that you must set the DEV variable to the correct device for your card.
My card shows up at /dev/sda; yours may show up at sdb.
We use the lsblk command to check
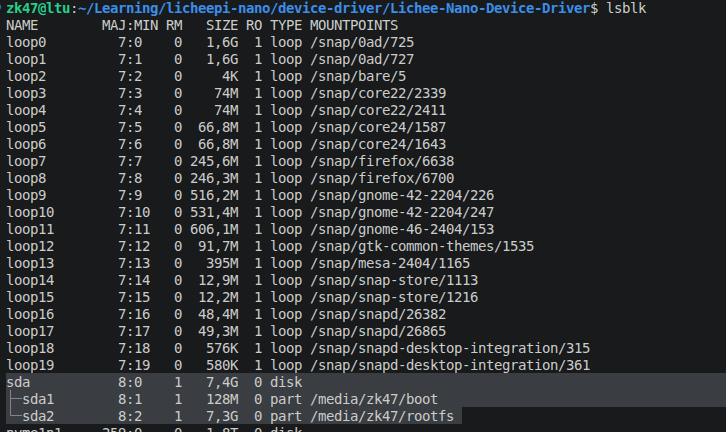
The SD card needs the following layout
| Region | Content |
|---|---|
| 0 to 8 KB | reserved |
| 8 KB | U-Boot SPL + U-Boot (raw, written directly with dd seek=8) |
| 1 MB | FAT32 boot partition: zImage, suniv-f1c100s-licheepi-nano.dtb, boot.scr |
| after boot | ext4 rootfs partition |
We create the layout
echo 'label: dos
start=2048, size=128MiB, type=b
start=264192, type=83' | sudo sfdisk $DEV
Write u-boot to the first area
sudo dd if=output/u-boot-sunxi-with-spl.bin of=$DEV bs=1k seek=8 conv=notrunc
Format the next 2 partitions for boot and rootfs as vfat and ext4 respectively
sudo mkfs.vfat -n boot   ${PART}1
sudo mkfs.ext4 -L rootfs ${PART}2
Copy the boot files here
sudo mount ${PART}1 /mnt
sudo cp output/zImage                                /mnt/
sudo cp output/suniv-f1c100s-licheepi-nano.dtb       /mnt/
sudo cp output/boot.scr                              /mnt/
sudo umount /mnt
Extract the root file system here
sudo mount ${PART}2 /mnt
sudo tar xfp files/core-image-minimal-f1c100s.rootfs.tar.xz -C /mnt/
sudo umount /mnt && sync
That's it; now remove the SD card, connect UART to the board and boot it up, and we get :vv
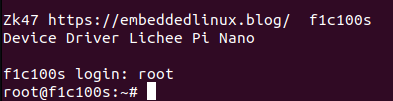
I set the default user to root !!
Good luck with the hands-on